Traditional and digital darkroom
This is section 4.7.3 of the book, on its own page for review. The figure is live: drag the divider, switch which two renderings you are comparing, and read the settings beside each photograph. Everything else on this page is exactly as it appears in the book.
4.7.3 What a photographer actually does with those sliders
Lightroom's develop panel is a menu. What matters is which controls someone good reaches for, in what order, and how far they push. So I asked Wojciech Jarosz, a computer graphics researcher and a photographer and retoucher whose work I admire, for a few of his raw files together with the versions he finished (his photographs are at photoblog.wojciechjarosz.com). Each file carries his develop settings inside it, so we can put the raw beside his print and read the recipe that connects them (Figure 4.7.3). The figure shows three renderings of each negative rather than two, because two different things separate a raw file from a finished photograph, and he exported both of his: the file at Lightroom's defaults, and the photograph as he finished it. Our own neutral render and Lightroom's default render differ only in what the maker of the software decided a raw should look like out of the box. Lightroom's default and his final frame differ by everything he then did.
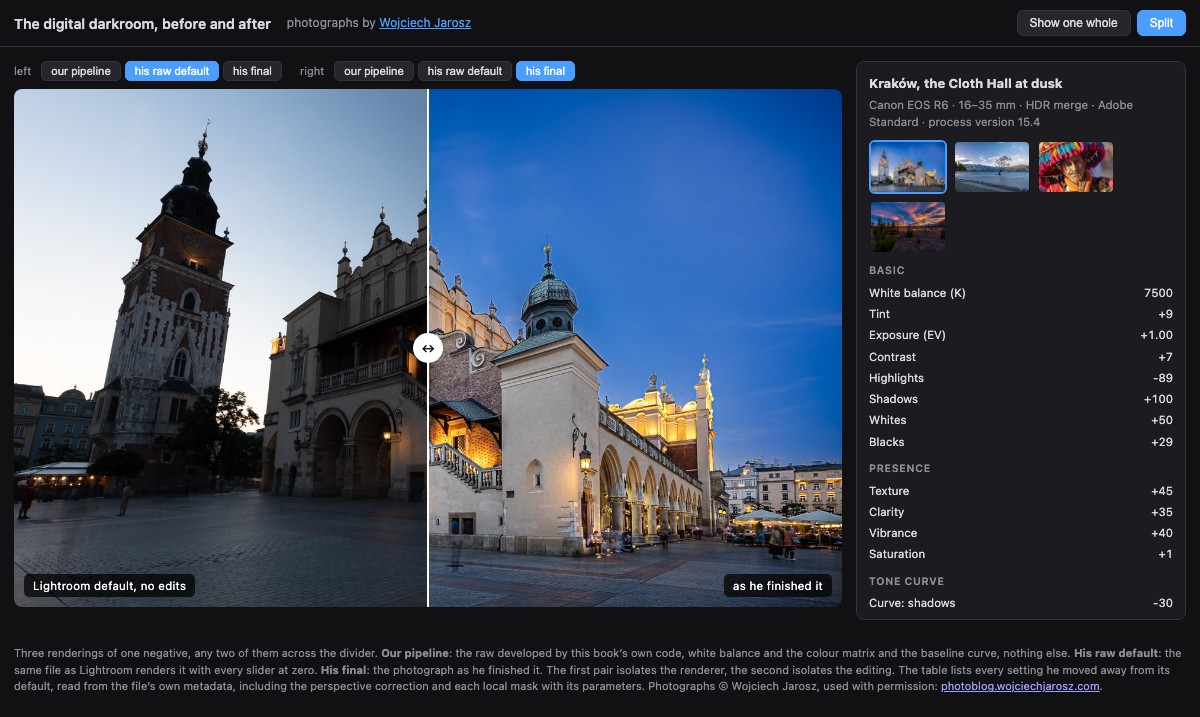
Here is what he moved, with the defaults left out.
| setting | Cloth Hall | Wanaka tree | Valley sunset | Portrait (2010) |
|---|---|---|---|---|
| White balance (K) | 7500 | 7350 | 3550 | 5000 |
| Tint | +9 | -9 | -1 | -1 |
| Exposure (EV) | +1.00 | +0.75 | +1.08 | -0.50 |
| Contrast | +7 | +5 | +7 | |
| Highlights | -89 | -52 | -83 | |
| Shadows | +100 | +60 | +80 | |
| Whites | +50 | +53 | +6 | |
| Blacks | +29 | +14 | -29 | |
| Texture | +45 | +23 | ||
| Clarity | +35 | +50 | ||
| Vibrance | +40 | +15 | +15 | +25 |
| Saturation | +1 | -1 | -2 | |
| Curve: highlights | +25 | |||
| Curve: darks | +16 | +25 | ||
| Curve: shadows | -30 | -20 | -40 | |
| Color mixer, saturation | Red +26, Orange +40 | |||
| Color mixer, luminance | Blue -52, Purple -20 | |||
| Post-crop vignette | -30 | -20 | ||
| Straighten (degrees) | -0.23 | 0.12 | ||
| Upright (perspective) | Auto, 2 guide segments | |||
| Constrain to warp | on | |||
| Lens profile | 16-35 mm | 16-35 mm | 16-35 mm | 70-200 mm |
| Local mask 1 | sky, AI selection | brush | ||
| saturation +82, exposure -0.25 EV, | exposure +0.09 EV, | |||
| contrast -84, highlights -100, | contrast +35, | |||
| shadows +100, temp -17, tint +24 | saturation -10 | |||
| Local mask 2 | linear gradient | brush | ||
| exposure +0.08 EV, contrast -100, | exposure +0.12 EV, | |||
| highlights +100, shadows +100, blacks +40 | contrast +50 | |||
| Spot removals | 1 | 1 | 1 |
The 2010 portrait speaks an older dialect: Brightness +50, Fill Light 30, Recovery 35, the controls Lightroom offered before the 2012 process version replaced them with Highlights and Shadows. Same intent, different parameterization.
One move dominates. On all three modern frames the exposure goes up by about a stop, the highlights come down hard (-52, -83, -89), and the shadows come up hard (+60, +80, +100). That is range compression, done by hand: the scene held more range than the print can, so the ends are pulled toward the middle and the middle is placed where he wants it. This is the Zone System's decision, made with sliders instead of development times, and it is the same job the tone-mapping chapter formalizes. Two of these files are HDR merges, so the range being compressed is larger still.
Compression flattens, so contrast is put back locally. Squeezing the ends toward the middle costs the picture its snap, which is why Texture and Clarity follow the tonal sliders rather than lead them (+45 and +35 on the dusk frame). These are local-contrast operators, unsharp masking at coarse scales, and they restore the impression of contrast without undoing the range compression that just saved the highlights. Contrast itself stays tiny (+5 to +7), because the heavy lifting already happened.
The endpoints are set deliberately, and not always the same way. Whites +50 and +53 push the bright end back up against the ceiling after the highlight recovery pulled everything down. Blacks go +29 on one frame and -29 on another: one scene needed its shadows opened further, the other needed a real black to keep the sunset from looking washed. There is no house setting here, only a judgment per picture.
Saturation is barely touched; vibrance does the work. Vibrance runs +15 to +40 while saturation stays within a point or two of zero. Vibrance eases off where a color is already saturated, so it lifts the muted colors and leaves the vivid ones (and skin) alone. The color mixer appears once, surgically: on the Wanaka frame the blue luminance goes to -52, darkening the sky without touching anything else, while orange saturation goes to +40 for the tussock and rock.
White balance is a decision, not a correction. The dusk square is set to 7500 K to keep it warm; the sunset is set to 3550 K to cool it down. Both are departures from what the camera guessed, in opposite directions, chosen for how the light should feel rather than for what a gray card would say.
Geometry gets corrected before anything is judged. Every frame has its lens profile switched on, by name (the Adobe profile for the 16-35 mm, or for the 70-200 mm on the portrait), which removes that lens's measured distortion and vignetting at full strength, together with automatic lateral chromatic aberration. This is correction rather than taste: it undoes what the glass did. The architecture frame goes further and applies Upright, Lightroom's perspective correction, in its automatic mode with two guide segments stored alongside, which is what you get when you draw lines along things that should be vertical. The transform the file records is a genuine projective one, and its effect is large: the verticals of the Cloth Hall and the tower converge in the raw and stand up in the final frame, which also explains the crop, since a keystone correction pushes the corners outside the sensor and the frame has to be brought back inside the warp. The other three frames are straightened by fractions of a degree instead, -0.23 and +0.12, the kind of correction you make on a horizon.
Local edits are few, and they are where the modern tools show up. Two of the four frames carry masks. On the dusk square there are two: an AI sky selection, with the sky's highlights taken all the way down (-100) and its shadows all the way up (+100), the exposure trimmed a quarter of a stop, contrast dropped hard (-84), saturation raised (+82) and the color pushed cooler (temperature -17, tint +24); and a linear gradient with contrast at -100 and blacks at +40. On the portrait there are two brushes, the first broad (radius 0.066 of the frame) at exposure +0.09 EV with contrast +35 and saturation -10, the second a pair of small dabs at exposure +0.12 EV and contrast +50. That is dodging, done with a brush instead of a card under an enlarger. Each frame also carries a single spot removal, the healing brush taking out one sensor dust mark or distraction.
The story is still overwhelmingly global. Two of the four photographs have no local edit at all, and where masks do appear they sit on top of a develop that was already most of the way there.
The whole recipe for a photograph is a few dozen numbers. That is what parametric means: the file on disk never changed, and everything above is a list of instructions that could be reapplied to the raw tomorrow, or copied to the next frame, or thrown away. Every one of those instructions is an algorithm this book builds later, and you can drive them yourself in Chapter 7.15, A raw developer in the browser.
The next parts build the computational pipeline behind these operations: image representation, the ISP, multi-frame fusion, and the editing operations themselves, which let a fingernail-sized sensor perform far above its physics. And at the end of BASIC IMAGE PROCESSING AND THE ISP, a digital darkroom you can drive: Chapter 7.15, A raw developer in the browser embeds a working develop module built from those chapters, running on your own raw files without leaving the page.
Photographs © Wojciech Jarosz, reproduced with permission. Section drafted by Frédo Durand with Claude Code for Computational Photography, and AI-powered slopendium. Settings are read from each raw file's own metadata, not retyped. Corrections to the reading of them, to the titles, or to the credit are all welcome.